For Bakugo Katsuki's boots, I bought a simple lace-up pair of knee-high combat boots for the base. Here's the link for the boots I bought:
Bakugo Boots (Base)
To start, I took out the laces and put a base layer of cheap white acrylic paint (I generally use DecoArt or Craft Smart acrylic paints) over all of the silver eyelets. You always want to have a base layer of white when you're painting over a darker color with a brighter color (in this case, red/orange on top of silver), and you'd be surprised by how well cheap white acrylic paint works for that purpose. You want to make sure the white is covering all of the silver so you can't see through it. Once that was dry, I put two, maybe three, layers of the orange/red acrylic paint combination I made over the white. I mixed DecoArt's Cadmium Orange and Red Alert acrylic paints to create the color I wanted. I then waited for that to dry and re-laced the boots (you might want to leave the laces out of the boot while you're working on the rest of it, especially if you want to seal the paint).
The pair of boots I got unfortunately had silver buckles I couldn't take off the shoe, so I decided to paint them black so they'd blend into the rest of the boot and not be too noticeable. I used the same painting process for this: couple layers of white paint as a base, couple layers of black paint on top.
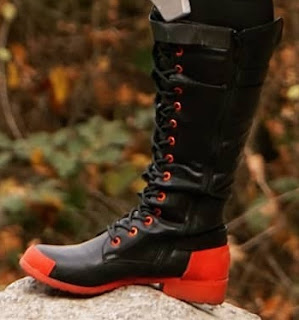
I painted the base of the boot (not the sole, but the rim around the bottom edge of the boot) and the heel red/orange as well. Same process: couple layers of white paint, three to four layers of red/orange paint. With this way of painting, the paint can easily chip and peel off when you wear the boots - to combat this, I sprayed a thin layer of clear Mod Podge over all of the red/orange parts (I did this before I laced them back up). It doesn't completely prevent the paint from getting chipped, but it does help. Paint-on clear Mod Podge would probably also work, or anything that's made to do a clear layer of sealant. Think of it like a clear gloss you'd put over painted fingernails.
For the orange/red rectangular details at the front and back of the boots, I took 2mm craft foam (can be found at JoAnns, Craft Warehouse, Hobby Lobby, online, etc.) and cut out rectangles in the correct size. With foam, you have to seal it before you can paint on it or all the paint just soaks into the foam. I believe I used clear paint-on Mod Podge to seal the foam in this case. Then I painted it red/orange the same way I painted everything else on the boot. I then used Contact Cement (found easily at most any hardware store) to glue the pieces onto the boot. I use Contact Cement because it's incredibly strong, but other glues could work too. Just test it.

For the tab at the top of the boot, I took 2mm craft foam and cut a long rectangular strip. I sealed it with Mod Podge on one side, and painted the small rectangle of red/orange on one end of it (the red/orange end will go on the outside of the boot). I painted the rest black, but you don't necessarily have to if you get black craft foam and want to skip some of the extra work. Then I sealed the paint. Once they were dry, I measured out a roughly 2" section on the outside section of the boot just beyond the laces and used Contact Cement to glue a 2" piece of Velcro to the boot itself. I measured where the matching piece of Velcro on the strip was going to go by holding the other end of it to the inside of the boot where the nearest side of the zipper was (as in, don't put the foam strip over the zipper) and loosely wrapped it around the boot, over the laces, and over the piece of Velcro already in place. I then marked where I needed to glue the other piece of Velcro on the inside of the strip of foam. I then took it off the boot and glued the Velcro in place. I then used Contact Cement to glue a 1.5" section of the strip to the inside of the boot, starting where the side of the zipper is. Your strip should go from the side of the zipper, over the laces, and Velcro on the other side of the laces, and then have an extra few inches loose to create that little curve out with the red/orange rectangle. You should have no problem getting the boots on this way if you un-Velcro the strip.
There you have it! Bakugo's boots. Good luck! If you have any questions, or are interested to see more of my cosplay content, you can follow me on Instagram: @madcapcosplays (
Sequoia's Instagram) and check out the rest of my blog for more tutorials. I also have a Ko-Fi for small donations towards my cosplay funds, if you'd like to donate a few bucks, here's the link:
Sequoia's Ko-Fi I hope you have a wonderful day, happy crafting!


Comments
Post a Comment